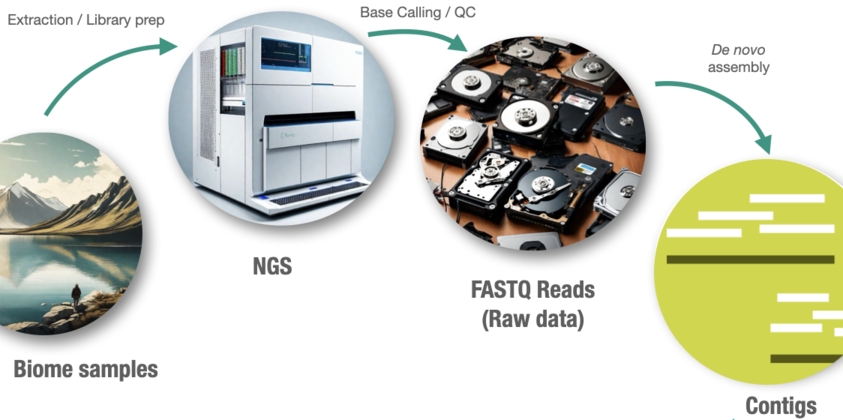
We start from raw reads of three samples and a co-assembly of them.
We will be using geNomad to identify bacteriophages and plasmids in genome/microbiome/virome assemblies. The tool is very easy to install, check the documentation here.
GeNomad utilizes an alignment-free and gene-based classifier hybrid approach to identify mobile genetic elements in a dataset and more information on how the tool works can be found in the publication.
This section will also use SeqFu for the sequences manipulation.
Installation
GeNomad can be installed as follows:
# Note the multiline command using trailing backslashes:
mamba create -n genomad --yes \
  -c conda-forge -c bioconda \
  genomad=1.9 seqfu=1.22
As with any conda/mamba environment, you will need to activate the environment to use the programmes within:
conda activate genomad
You can now check whether the programme was installed well and is functioning by invoking the help message.
genomad --help
EBAME Workshop: we already have it in our VMs at
$VIROME/db/genomad_db/.
If you install geNomad on your own computer, you can download the database with the following command:
genomad download-database .
The . means “download the database in the current directory”: you can change it to a different path if you want.
Running geNomad

Image from https://portal.nersc.gov/genomad/.
geNomad has a set of modules, which combined compose the whole workflow. The modules are:
- geNomad annotate will perform gene calling in the input sequences and annotate the predicted proteins with geNomad’s markers.
- geNomad find-proviruses will find putative proviral regions within the input sequences.
- geNomad marker-classification will classify the input sequences into chromosome, plasmid, or virus based on the presence of geNomad markers and other gene-related features.
- geNomad nn-classification will classify the input sequences into chromosome, plasmid, or virus based on the nucleotide sequence.
- geNomad aggregated-classification will aggregate the results of the marker-classification and nn-classification modules to classify the input sequences into chromosome, plasmid, or virus.
- geNomad summary will summarize the results across modules into a classification report.
We will use the end-to-end command to run the full geNomad pipeline
(remember to use genomad --help to look at the options/parameters you can choose,
and remember to modify the command to suit your own inputs, outputs and desired options).
To run genomad you will need:
- The assembly (FASTA file)
- The database directory
and you need to specify the output directory of course.
![]() You can try and create the command to run using
You can try and create the command to run using genomad end-to-end --help to see the manual, or just read below.
genomad end-to-end $VIROME/human_gut_assembly.fa.gz ~/genomad-out $DB/genomad_db/ -t 8
The parameters are:
-
<ASSEMBLY>, -
<OUTPUT_DIR>, -
<DB_DIR>, -
-t INTfor the number of threads.
![]() Check the information printed on the screen. At the end geNomad will tell where the important files are!
Check the information printed on the screen. At the end geNomad will tell where the important files are!
Main output file
![]() What file contains the predicted viral genomes? How many sequences are there?
What file contains the predicted viral genomes? How many sequences are there?
seqfu stats -nbt ~/genomad-out/human_gut_assembly_summary/human_gut_assembly_virus.fna
-
-nwill print a table nice to see in the terminal (by default is TSV) -
-bwill use the basename of the file instead of the full path, this saves some space -
-tto add thousands separators
When we’re finished using this programme, we can deactivate the conda environment:
conda deactivate
Note that when deactivating an environment you do not need to specify the name, this is only true when activating an environment.
Renaming a FASTA file
The sequence names given by geNomad are not the favourite for some tools like Anvi’o (well, some dependencies of Anvi’o).
Let’s have a look at the sequence names first: note that at the end there are unwanted characters.
We can use SeqFu to rename the sequences: we can use a new shortcut --anvio:
# To make commands easier, we can use variable like:
GENOMAD_OUT=~/genomad-out/human_gut_assembly_summary/human_gut_assembly_virus.fna

# to be recalled with $VARNAME
seqfu cat --anvio --report rename_report.txt $GENOMAD_OUT > ~/genomad-out/genomad_votus.fna
We will now consider ~/genomad-out/genomad_votus.fna to be our final output of geNomad.
![]() This command also spits a mapping file (
This command also spits a mapping file (rename_report.txt) that can be useful to track the changes.
Check the excellent geNomad documentation